February 11, 2014

Picture Molding, a Chin-Up Bar, and the Final Popcorn

A few weeks ago we had a carpenter come out and do some odds and ends tasks for us!

Picture Molding:
The crown molding in our living room had this really odd look in that it was not flush with the ceiling but was instead dropped from the ceiling about an inch. When I first noticed it I thought it was at one time intended to be flush with the ceiling and things had just settled over the years causing the strange gap. Turns out, though, that this type of molding is a real thing that people install intentionally. It's called "Picture Molding" and it is commonly seen in houses of this age.
Our carpenter told us that years ago walls used to be made out of plaster and that driving a nail into plaster to attempt to hang a picture was pretty much impossible. So instead, they would install their molding with about an inch drop from the ceiling, just enough space to attach a hook onto to hang their portraits. Oh the trivia you can learn form old houses.
No worries, our walls are NOT made of plaster, and there is definitely no longer a need for this type of molding, as I don't think I'll be hanging any pictures from it. And although it is a neat story and probably does have some character value, the one-inch gap was really just not appealing to me. So we decided to have it taken down and replaced with a more traditional crown molding. 

Our ceilings/dry-wall guy took down the molding while he was doing the dry-wall work: 
And a few weeks ago we had Chris put up some brand-new crown molding:

Completely flush with the ceiling!
And the painted finish:


The Chin-Up Bar:
The entry way to our kitchen had this lovely bar going across the top that the previous owners used to show off their tea-pot collection. :) 
During one of our many brainstorming sessions on what all we wanted to do with this house, we came up with the idea to fill in this entry way and frame it in with a casing. Although Adam was really wanting to keep this bar as his own personal chin-up bar, he got overrode on this one. We also decided to continue this crown through the kitchen since the top trim on the cabinets had started to settle in some places and come away from the ceiling. 
 Here is Chris knocking down the old trim.
 And the lovely popcorn ceiling underneath.
 You can see where the cabinets have settled creating a separation.
The bar knocked down and filled in with dry-wall!
The brand new crown and casing in place!
And the painted finish:
I know most of you were really on the edge of your seat wondering why I left that top piece of trim the original cabinet color when I posted the painted cabinet pictures... now you know why!!

The Final Popcorn:
When Drywall Steve smoothed our ceilings there was a small spot above the hallway linen cabinet that he knew would be impossible to smooth. For some reason, the cabinet was built just about 4 inches short of the ceiling and it was impossible to reach any type of tools into that space to get it smooth. So we decided to conceal this final section of popcorn by extending the cabinet to the ceiling with a larger piece of crown molding. 
And the painted finish:
Looks like it has always been there!!

We used Chris Moffatt for all of these projects. He was great to work with and we were really pleased with his work. I would definitely recommend him if you need any trim carpentry work done in the Upstate area!! Let me know if you would like his contact info! 

We are slowly but surely getting things checked off that project list!!

January 26, 2014

Extreme Makeover: Cabinet Edition

Another debate we had early on was trying to decide the best way to update our kitchen cabinets. The cabinets were a nice, solid wood so we really didn't feel like it was necessary to completely tear them out and start over (nor did that fit in the budget!), but they were really worn in spots from years of use and just had an overall dated look, so they definitely needed some attention.


After toying with some other ideas, we eventually decided that a coat of paint would be the most predictable way to cover all the wear spots while also giving the cabinets a fresh, updated look. I was also really loving the white/off-white kitchens I had been seeing online so it was a win-win! 

I chose Sherwin Williams Antique White:


I actually stole this color idea from my parents who just re-did their kitchen last year and used this color for their cabinets. It was just a basic off-white and I loved how it turned out in their kitchen, so I went with it. Which is probably a good thing because I think if I would have had to sort through a million different shades of white I might have gone insane.

So since we had plenty of time and plenty of room (we aren't trying to live in the house while all of this is going on) we knew this would be a DIY project we could handle. I actually took this on as my personal project over Thanksgiving/Christmas break while Adam and my dad were working on the rest of the painting. So after a crash course in cabinet painting from my dad who had just re-painted his cabinets last year, I got to work!

I took everything off the cabinet frames (doors, shelves, and drawers) to make it easier to paint. The first thing I did was give everything a thorough cleaning using some paint prep material and then lightly sanded everything down to remove the top varnish and hopefully create a paint-friendly surface.


Here's a look at the set up: A set of sawhorses with two rows of 2x4's across the top and bottom. I then used these cabinet knobs (old hardware from my parents' kitchen) to rest the doors on while painting so that I could get to the edges. 

ALLLL the doors, drawers, and shelves finally finished!

Once I finally finished all the unattached stuff, I started on the frames... 
and found a 1950s surprise behind the cabinets... Check out that sweet wallpaper!!
WHAT a difference we saw after getting those frames painted! 
I give my mom major credit for the idea to paint the top part of the cabinets Latte (which is the same color as the Dining Room/Den). The Latte and the Antique White coordinate so well and it really looks good to break up the cabinet color while also bringing in the Latte from the other part of the room. 

Remember this lovely wooden valence above the window?
I think this one piece completely dates the kitchen aside from anything else and I have been wanting to knock this thing down since the day we moved in! 
Here is Dad doing the honors of sawing it in half.
And there it is! No more valence and looking SO much better!!


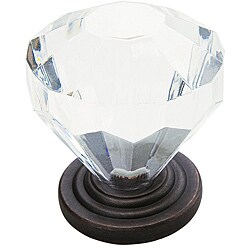
So finally after weeks of prepping, cleaning, and painting, we were ready to attach new hardware and rehang the cabinets! One of my favorite features of the house are the original crystal doorknobs, so when I came across these knobs online I knew it would be the perfect way to keep a unique charm in the kitchen while also giving it an updated look! 
I decided to pair these with a basic pull for the drawers.
My crew hanging the beautiful cabinets! 
(Which was, let me tell you, NOT as easy as it seems)

And here is the painted finish!!

So there you have it.. my cabinet makeover!! And although there is still a lot left to be done in this little ol' kitchen.. what a difference a coat of paint makes!!